Lab 7: The World I See
Goal: Integrate computer vision with voice control to enable Pupper to track objects and respond to visual commands using multimodal AI!
In this lab, you’ll combine computer vision, voice interaction, and AI to create an intelligent robot that can:
See and understand its environment through camera input
Track objects like people, dogs, cats, and 80+ other COCO dataset objects
Respond to voice commands with visual context (e.g., “Follow that person”, “What do you see?”)
Use multimodal AI that processes both audio and visual input simultaneously
This lab builds on Lab 6’s voice control by adding vision capabilities, creating a truly multimodal AI experience where Pupper can see what you’re talking about!
Note: This lab is long and challenging, so please start early and ask questions if you get stuck. We’re here to help!
Key Technologies:
HAILO-8L AI accelerator for real-time object detection
OpenAI Realtime API with multimodal support (audio + vision)
ROS2 state machine for robust tracking behavior
Foxglove for real-time visualization
Step 0. Setup and Environment
Install Foxglove
Install Foxglove locally on your computer (not the browser version). Foxglove will be your primary visualization tool for seeing camera feeds, object detections, and robot state in real time.
Install Dependencies
Install the required dependencies (downgrading numpy to a version below 2.0.0 is crucial):
pip install supervision loguru pygame sounddevice websockets numpy==1.26.0
Open the lab 7 code repository (lab 7 code repository) on your GitHub account. Then, fork the repository to your own GitHub account following the instructions in 🍴 Forking Repositories Guide.
Clone the forked repository to your Raspberry Pi:
cd ~/
git clone https://github.com/YOUR_USERNAME/lab_7_fall_2025.git
Note: Replace YOUR_USERNAME with your actual GitHub username.
Open the lab 7 folder in VSCode
cd ~/lab_7_fall_2025
code .
Configure API Keys
Set up your OpenAI API key for multimodal voice interaction:
python setup_api_keys.py
Follow the prompts to enter your OpenAI API key. This enables the multimodal Realtime API that processes both audio and vision.
Review the Lab Structure
The lab follows a progressive workflow:
Visualization (
run_foxglove.sh) → See camera feed and detectionsTracking Logic (
lab_7.py) → Implement state machine for object trackingKarel API (
karel.py) → Add tracking commands to robot controlTesting (
run_tracking.sh) → Test tracking without voiceVoice + Vision (
realtime_voice.py) → Add multimodal AI capabilitiesCommand Parsing (
karel_realtime_commander.py) → Parse voice commands with trackingFull System (
run_full_system.sh) → Complete integrated experience
Important Note on Process Management: This lab involves many interconnected components (camera, object detection, state machine, voice processing, etc.). Unlike previous labs where you might open multiple terminals, we’ve provided launch scripts that handle all the process management for you. For each step, you’ll typically just need to open one terminal and run the appropriate bash script. The scripts automatically start all necessary background processes and handle cleanup when you stop them with Ctrl+C. This makes the lab much more manageable!
Step 1. Visualization Setup
First, let’s get the visualization system running so you can see what Pupper sees.
Start Foxglove Visualization
Launch the visualization system:
cd ~/lab_7_fall_2025
bash scripts/run_foxglove.sh
This starts:
ROS2 camera and control systems
Foxglove bridge for visualization
HAILO object detection with bounding boxes
Connect Foxglove to Pupper
Connect your laptop to Pupper via Ethernet cable
SSH with port forwarding:
ssh -A -L 8765:localhost:8765 pi@pupper[GROUP_NUMBER].localOpen Foxglove, click
Open Connection, use default websocket URLws://localhost:8765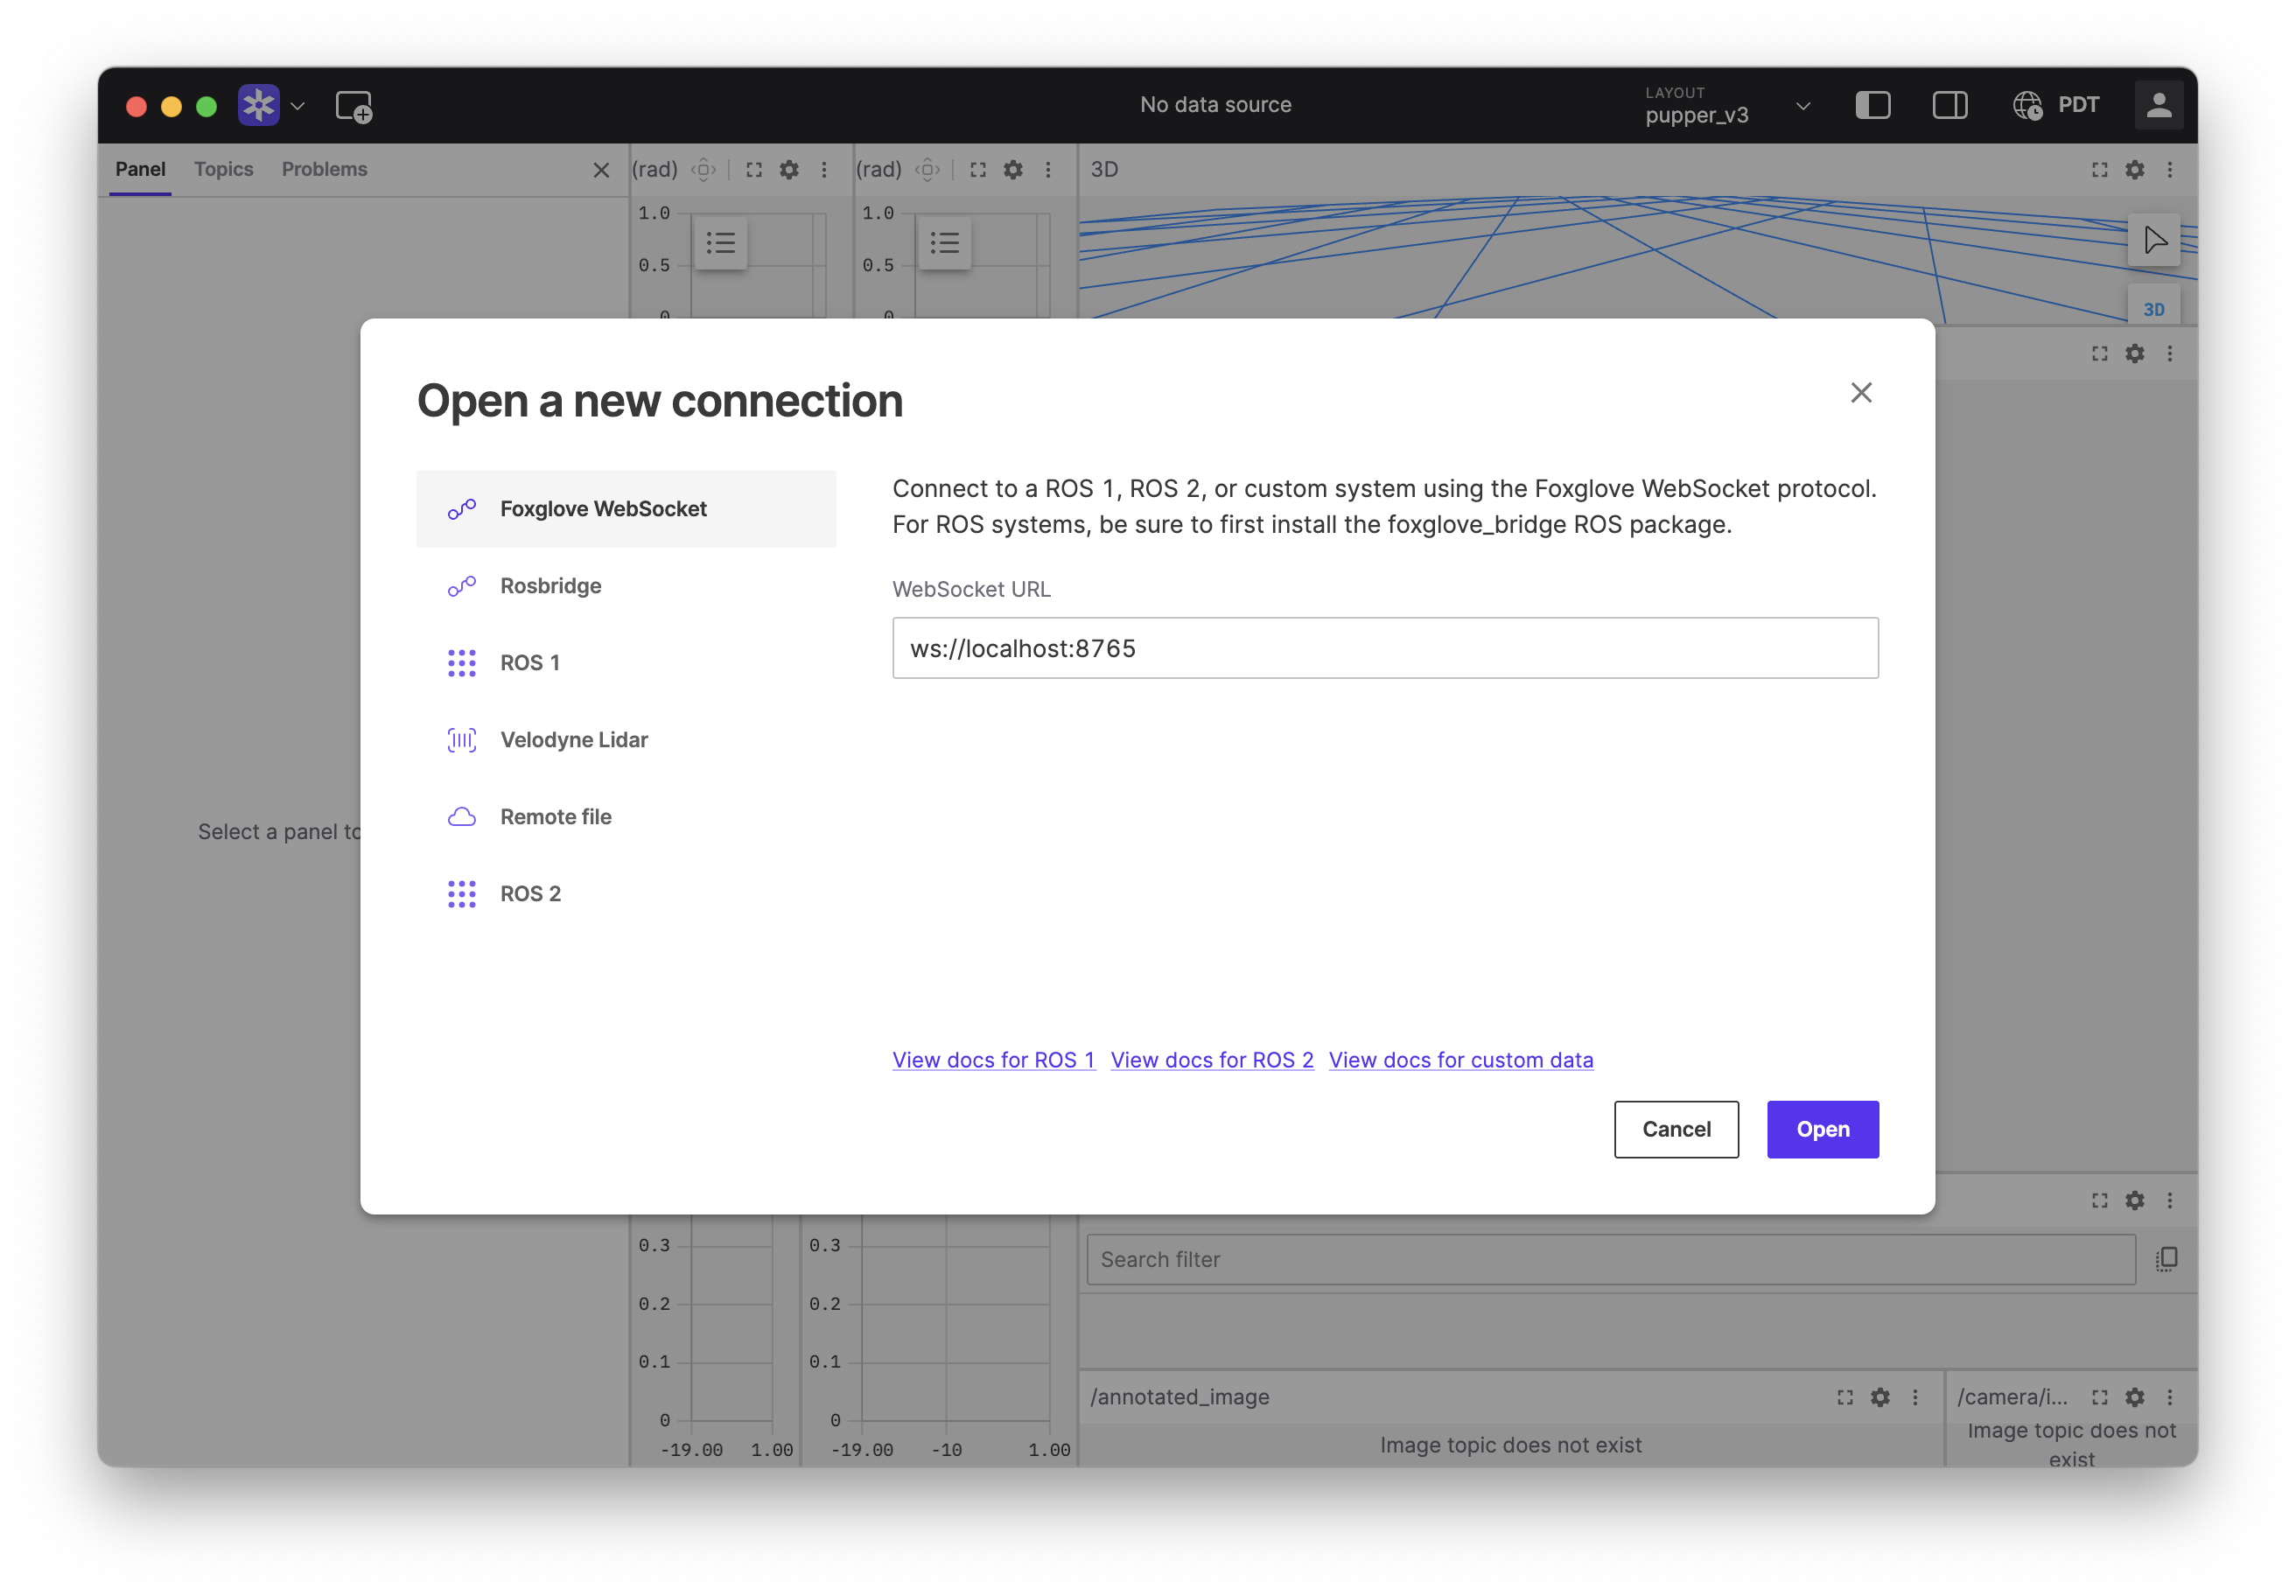
Connecting Foxglove to the Raspberry Pi.
Configure the image panel: - Click the gear icon on the image panel - Set topic to
/annotated_image- Set calibration toNone- Go fullscreen for better visibility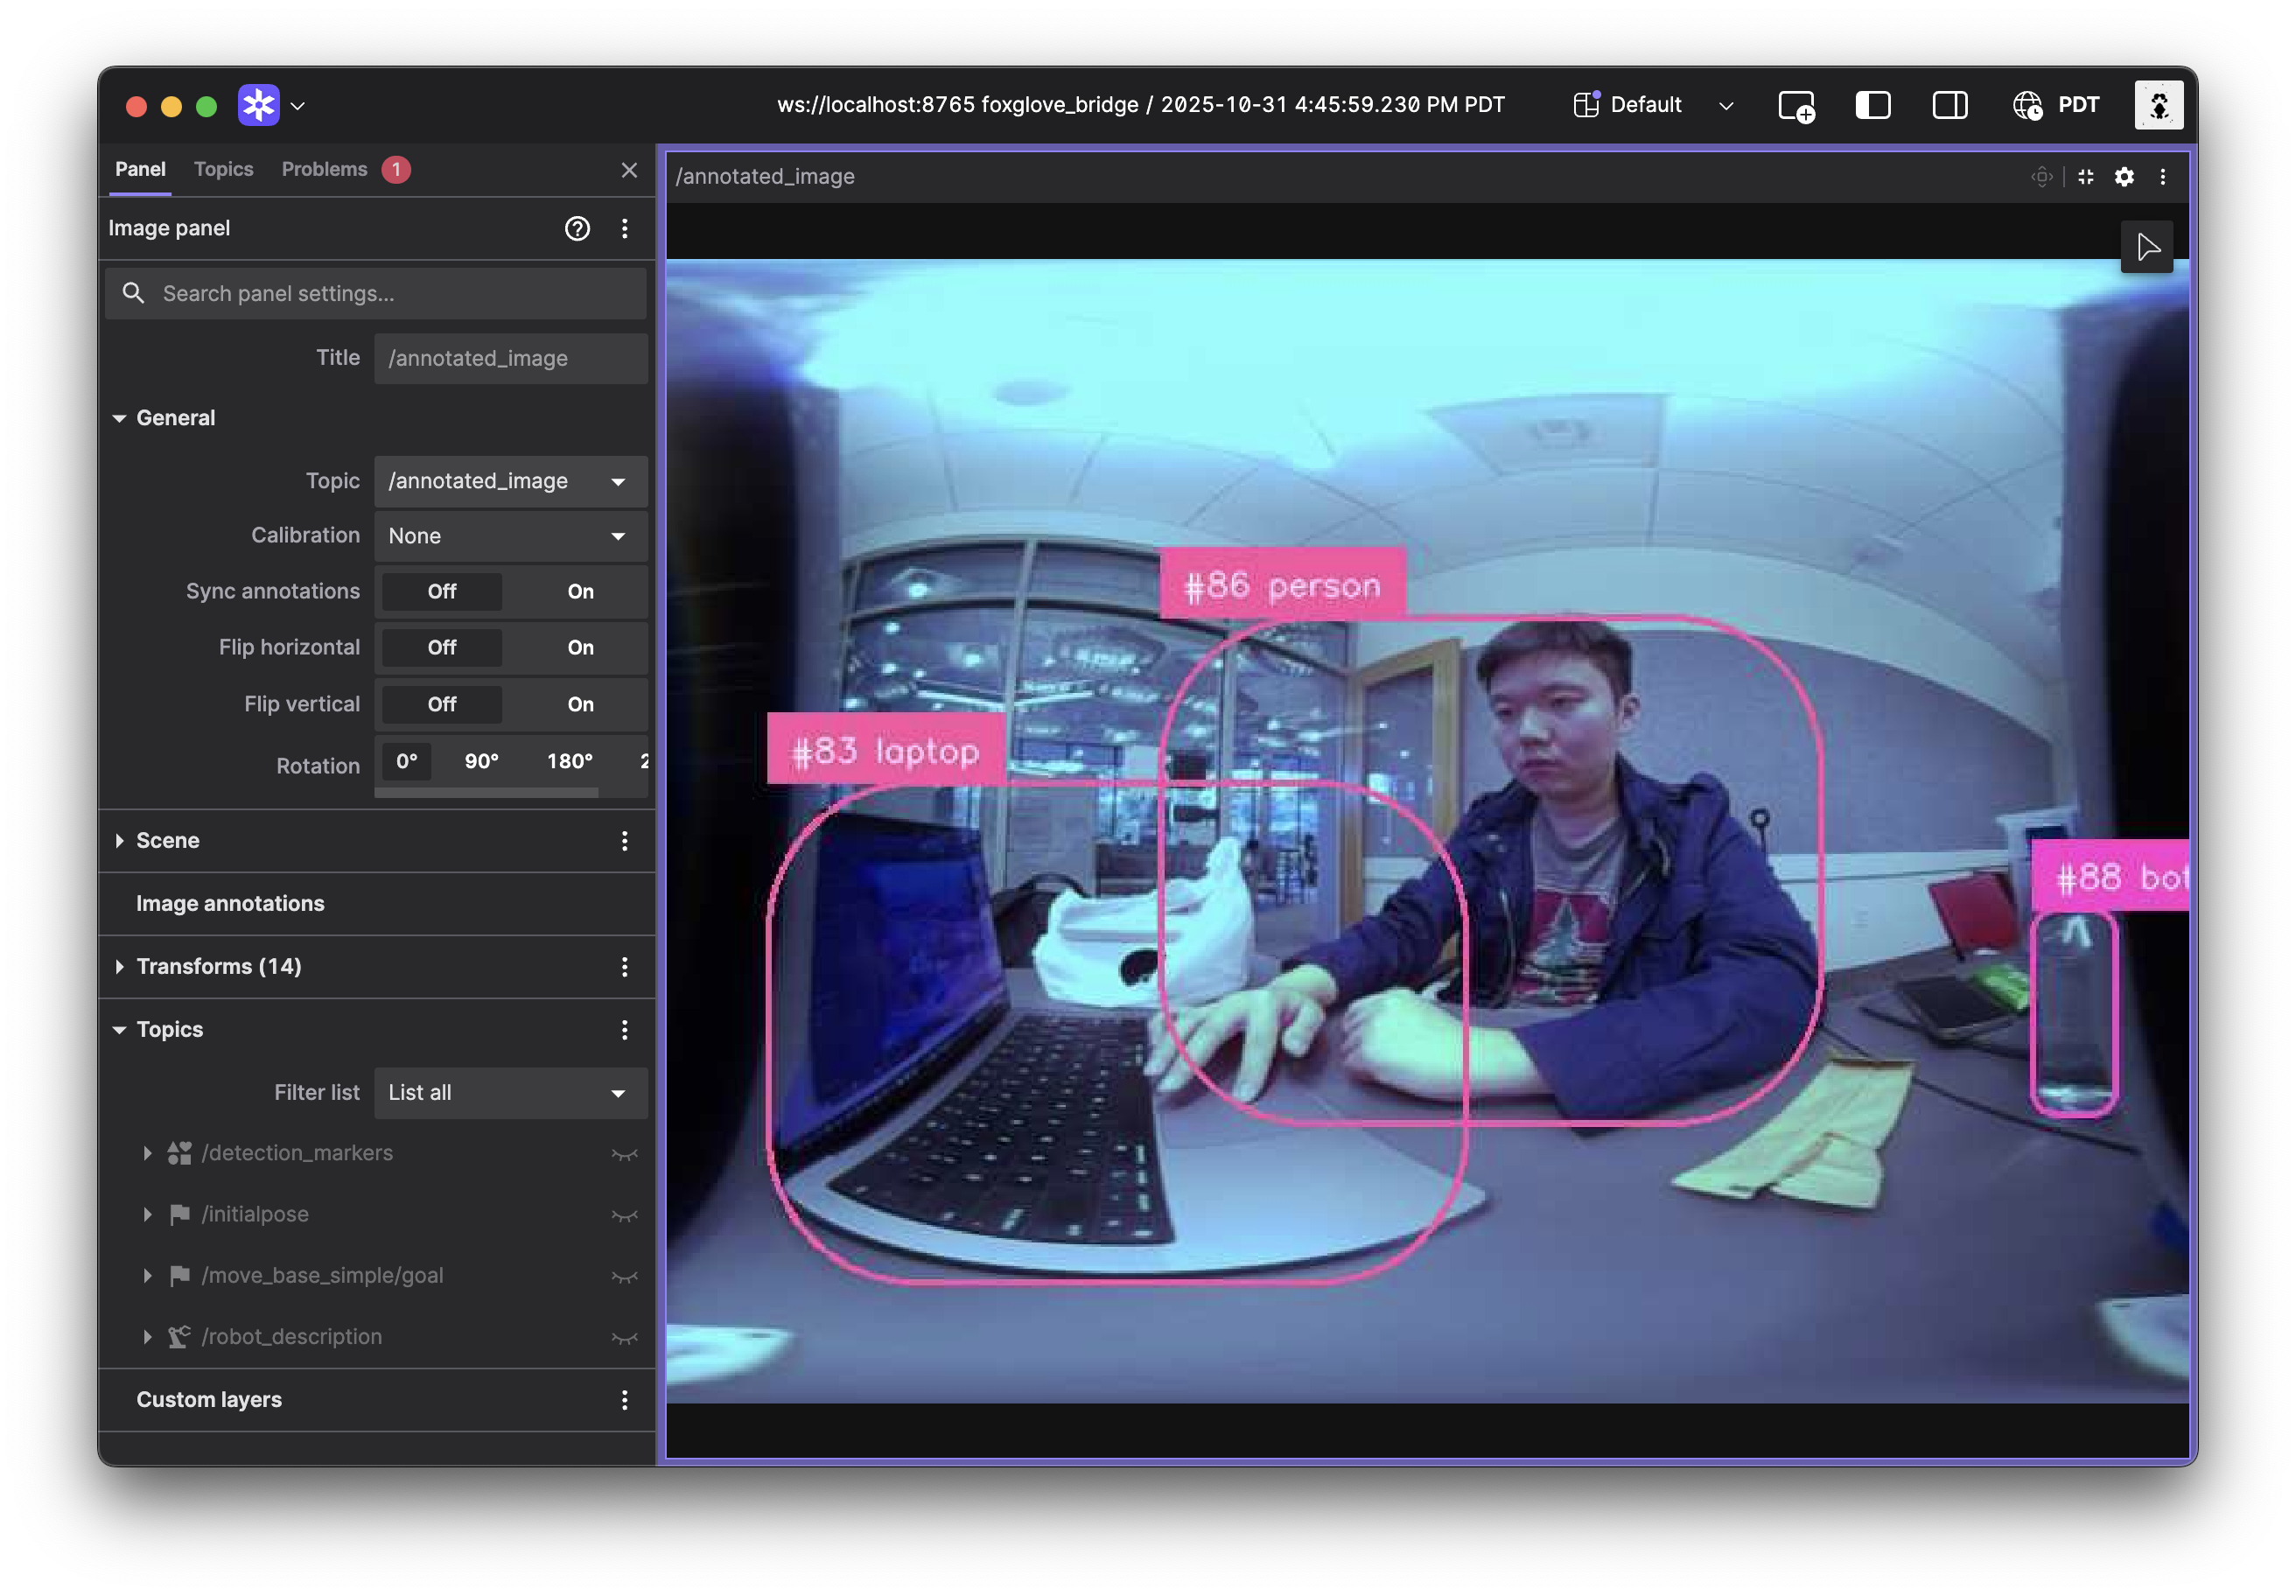
Configure the image topic to see object detections.
Verify Object Detection
You should see a camera feed with bounding boxes around detected objects (people, dogs, cats, etc.). The system can detect 80+ different object types from the COCO dataset.
Note on Image Processing: The raw fisheye camera images have been converted to equirectangular format for better object detection performance. Fisheye lenses create significant distortion that can hurt detection accuracy, so we unwarp the images to a more standard rectangular projection. If you’re curious about how this works, take a look at
fisheye_converter.py(totally optional) - it shows the mathematical transformation from fisheye coordinates to equirectangular coordinates.If you don’t see detections, ask a TA. If the image is upside down, you can flip it by editing the
hailo_detection.pyfile.
DELIVERABLE: Take a screenshot of Foxglove showing object detections with bounding boxes. Upload this to Gradescope.
Step 2. Implement Tracking State Machine
Now you’ll implement the core tracking logic in lab_7.py. This file contains a state machine that processes object detections and controls Pupper’s movement.
Understand the State Machine
Open
lab_7.pyand examine the structure:State.IDLE: No tracking active (allows manual Karel commands)
State.SEARCH: Rotating to search for target when lost
State.TRACK: Following detected target
The state machine receives: - Object detections from
/detectionstopic - Tracking control commands from/tracking_controltopicImplement Detection Processing
In the
detection_callbackfunction, you’ll need to process incoming detection messages. Look at the ROS message structure and figure out how to:Extract detection data from the message
Determine the position of detected objects in the image
Normalize positions so the center of the image is at 0
Decide which detection to track when multiple objects are present
Keep track of when detections occur for timeout logic
Hint: Check the ROS Message Documentation to understand the message structure.
DELIVERABLE: What line of code extracts the x-coordinate from a detection? Write the full Python expression.
Implement State Transitions
In the
timer_callbackfunction, you need to decide when to switch between states. Think about:How do you know if a detection is “recent” or “stale”?
What should happen when no objects have been seen for a while?
How do ROS timestamps work, and how do you convert them to seconds?
Implement Control Logic
For each state, determine what motion commands make sense:
SEARCH state: How should the robot move to find a lost target?
TRACK state: How should the robot move to follow a detected target?
Consider proportional control for smooth tracking and think about the direction of rotation needed.
Set Constants
Define and tune appropriate values for: -
TIMEOUT(seconds before switching to search) -SEARCH_YAW_VEL(rad/s rotation speed while searching) -TRACK_FORWARD_VEL(m/s forward speed while tracking) -KP(proportional gain for centering)
DELIVERABLE: Draw a state machine diagram showing transitions between IDLE, SEARCH, and TRACK states. Include all transition conditions and upload to Gradescope.
Note
Debugging with pdb: If your tracking behavior isn’t working as expected, use Python’s debugger to inspect what’s happening. Add breakpoint() in your detection_callback and timer_callback functions in lab_7.py to examine:
Are detections being received? What does
msg.detectionscontain?Is
self.target_posbeing set correctly?Are state transitions happening when you expect them to?
What values are your control commands (
yaw_command,forward_vel_command)?
Run python lab_7.py and when it hits the breakpoint, you can inspect variables with p variable_name and step through code with n (next line) or c (continue).
Step 3. Implement Karel Tracking API
Next, add tracking capabilities to the Karel API so voice commands can control the tracking system.
Implement begin_tracking() Function
In
pupper_llm/karel/karel.py, you’ll see a newbegin_trackingmethod with detailed TODO comments. Study the existing code structure and figure out:How to enable tracking mode in the Karel API
What message format the state machine expects for starting tracking
How to publish ROS messages and ensure they’re sent
Implement end_tracking() Function
Similarly, implement the
end_trackingmethod by understanding:How to disable tracking and clean up state
What message tells the state machine to stop tracking
How to ensure the robot stops moving when tracking ends
Copy Lab 6 Movement Functions
Copy your implementations from Lab 6 for:
move_forward(),move_backward(),move_left(),move_right()turn_left(),turn_right()bob(),dance()
Step 4. Test Tracking System
Test your tracking implementation without voice control first.
Launch Tracking Test
bash scripts/run_tracking.sh
This launches all tracking components and an interactive test script.
Test Tracking Commands
The interactive test script will let you manually trigger tracking commands. Experiment with different object types and observe the behavior.
Verify Behavior
Watch how Pupper behaves in different scenarios:
What happens when no objects are visible?
How does it choose which object to track when multiple are present?
Does the tracking feel natural and responsive?
How well does it handle objects moving in and out of view?
DELIVERABLE: Record a video of Pupper successfully tracking a person, showing search and track behaviors. Upload to Gradescope.
DELIVERABLE: Record a video of Pupper tracking the same person when two people are present on the screen. Talk about how you implemented the tracking logic to handle multiple objects. Upload to Gradescope.
Note
Debugging Tracking Issues: If tracking isn’t working after implementing the Karel API, the issue is likely in the communication between components. Add breakpoint() in lab_7.py to debug:
In
tracking_control_callback: Is the tracking control message being received? What doesmsg.datacontain?In
detection_callback: Are detections still being processed when tracking is enabled?In
timer_callback: Isself.tracking_enabledset correctly? Is the state machine transitioning properly?
Also check your Karel implementation - are the tracking control messages being published correctly? Add breakpoint() in begin_tracking() and end_tracking() to verify the message format and publishing.
Step 5. Implement Multimodal Voice System
Now add vision capabilities to the voice control system from Lab 6.
Write System Prompt
In
pupper_llm/realtime_voice.py, you’ll need to create a comprehensive system prompt that teaches GPT how to be a robot with vision. Consider:What personality should Pupper have?
How should it describe its vision capabilities?
What movement and tracking commands should it support?
How should it format its responses so the command parser can understand them?
What examples would help it understand the multimodal context?
Look at the TODO comments for guidance on the required capabilities.
Implement Camera Snapshot Processing
Complete the
camera_snapshot_callbackmethod:Convert JPEG data to base64:
base64.b64encode(msg.data).decode('utf-8')Store in
self.latest_camera_image_base64Set
self.camera_image_pending = True
Implement Image Sending
Complete the
send_camera_image_if_availablemethod:Check if image is available and pending
Create multimodal message with text and image content
Send to OpenAI Realtime API in the specified format
Set
self.camera_image_pending = False
Step 6. Implement Voice Command Parsing
Update the command parser to handle tracking commands.
Copy Lab 6 Command Parsing
In
pupper_llm/karel/karel_realtime_commander.py, you’ll need to bring over your Lab 6 implementations. The file has extensive TODO comments explaining what each function should do.Add Tracking Command Parsing
Extend your command parsing to handle tracking. Think about:
What different ways might someone ask to track an object?
How do you extract the object name from natural language?
What canonical command format should you use internally?
Add Tracking Command Execution
Update your command execution to handle tracking commands. Consider:
How do you detect tracking-related commands?
What Karel API methods should you call?
How do you handle the timing of tracking operations?
Step 7. Full System Integration
Finally, test the complete multimodal system.
Launch Full System
bash scripts/run_full_system.sh
This starts all components:
ROS2 control and camera
Object detection with HAILO
Tracking state machine
OpenAI Realtime API with vision
Karel command parser
Test Voice + Vision Commands
Experiment with natural voice commands and see how well the system understands context. Try asking about what Pupper sees, giving tracking commands, and mixing manual control with autonomous behavior.
Verify Multimodal Behavior
Pay attention to how the system integrates different modalities:
Does voice control work better when Pupper can see what you’re referring to?
How does the system handle ambiguous commands?
What happens when you give conflicting voice and tracking commands?
How natural does the interaction feel?
DELIVERABLE: Record a video demonstrating the full multimodal system: voice commands with visual context, object tracking, and manual control. Upload to Gradescope.
DELIVERABLE: Write a reflection (2-3 paragraphs) on the integration of vision and voice control. What are the advantages of multimodal AI? What challenges did you encounter? How could this system be improved?
Congratulations! You’ve built a sophisticated multimodal AI system that combines computer vision, voice interaction, and robotics. Pupper can now see, listen, understand, and act in the world around it!