Lab 5: How to Train Your Dog
Goal: Train Pupper to walk using reinforcement learning!
Step 0. Setup, and Test Bluetooth Connection
Clone the github repository of lab 5 to your Pupper (you will not need to modify any code in this repo):
cd ~/
git clone https://github.com/cs123-stanford/lab_5_fall_2025.git
Connect your remote controller with Bluetooth or USB cable to give Pupper velocity commands. For Bluetooth setup, follow the instructions at this link. You can control the Pupper and switch between policies using the remote controller, as shown in the image below:

CS123 Specific Gamepad Controller
After pressing the “x” button on the remote controller, you should see Pupper walking with the default policy. Use the left joystick to control Pupper’s walking direction and speed. The right joystick controls turning. Press any button on the remote controller to switch to a different policy.
- If Pupper is not walking properly, check if:
The remote controller is properly connected/turned on
There’s any wiring issues with Pupper’s motors
You are using the default walking policy, which you can switch to by pressing the “x” button on the remote controller.
There is a bad IMU reading message after you reinitialize the neural controller (Let’s really hope that doesn’t happen…)
DELIVERABLE: Take a short video of Pupper walking with the default policy. How does this compare to your implementation from lab 4?
Step 1. Colab setup
Make a copy of the Pupper Lab 5 Colab
Purchase Colab Pro and set the GPU to A100. Select runtime in the top panel -> change runtime type -> A100. We will reimburse you for the $10 cost of the GPU — just fill out the [reimbursement form here](https://forms.gle/sFHnBEUubMzKw3dT8).
To track our training progress and compare between different runs, we will use wandb (pronounced “weights and biases”) to log all our training efforts (Fun Note: Weights and Biases just went through a huge acquisition, and the Founder/CEO is actually a good friend of Stuart’s!). It’s really easy to set up! For first time users, create a wandb account, and generate an API key by going to this link
Set up your wandb key by pasting your API key into cell 1 and running it.

After pasting your wandb key, you should see a message like this. This means all your training logs will be saved to your wandb account!
Now that you have set up wandb on Colab, you need to configure your Pupper to work with the neural controller settings for Lab 5. On your Pupper, navigate to the lab 5 directory and rebuild the neural controller:
cd ~/lab_5_fall_2025
python3 rebuild_neural_controller.py
This script will rebuild the neural controller to match the settings we will use in Lab 5, allowing you to deploy your own trained policies. After the neural controller is rebuilt on Pupper, it will prompt you to provide an authorization code from your wandb account.
Visit the wandb authorization link that appears in the terminal, and paste the authorization code from your wandb account (the same account you are using on Colab). This will enable you to directly deploy your trained policies remotely by specifying the run number - each of your trained runs will follow a sequential number.
Deploying your trained policy is simple! Just run the deployment script:
python3 deploy.pyThe script will prompt you to provide the number of your desired checkpoint run. You can press Enter directly if you want to keep the current test policy, or enter a specific run number to deploy a policy you trained in Colab.
After the neural controller is deployed with your policy, press the square button on your PS5 controller to switch to the policy you have just trained!
Step 2. Notebook Overview
Setting up a proper RL environment is an extremely time-consuming process. Although the majority of the setup is already implemented for you, there are still many parameters that you can tune.
The notebook is organized into several key sections. The notebook leverages JAX’s powerful GPU acceleration to train Pupper in thousands of parallel environments simultaneously. This massive parallelization dramatically speeds up the training process, allowing us to collect large amounts of experience data efficiently. Each environment runs an independent simulation of Pupper, enabling rapid exploration of different walking strategies and faster convergence to optimal policies. The key sections are:
Rewards
The reward function is crucial for training Pupper to walk effectively. This is the part of the notebook that you will be tuning for this lab. The notebook provides several reward terms that you can tune:
Velocity Tracking: Encourages Pupper to match desired linear and angular velocities
Effort Minimization: Penalizes excessive motor torques and energy consumption
Stability: Rewards maintaining a stable orientation and penalizes falling
Smoothness: Encourages smooth joint movements and penalizes jerky motions
Height: Rewards maintaining a desired body height
Foot Contact: Encourages proper foot placement and contact timing
Refer to the rewards.py file for reward definitions. You need to understand the exact implementation of each reward term to determine what coefficients to use on these rewards.
MJX Configs
The MJX (MuJoCo + Jax) configuration controls the physics simulation environment:
Robot Parameters: Mass, inertia, and dimensions of Pupper’s components (you should not change these)
Control: Motor dynamics, PID gains, and actuation limits (you don’t need to change these for this lab)
PPO Configs
Proximal Policy Optimization (PPO) is a popular RL algorithm for training robot policies. We won’t cover the details of this algorithm in this class for simplicity–you can think of it as an optimizer to train RL models for maximizing rewards. The PPO configuration controls the learning process:
Network Architecture: Size and structure of the policy and value networks (you should not change these for this lab)
Training Parameters: Learning rate, batch size, number of epochs
Policy Clipping: Limits on policy updates to ensure stable learning (you should not change these for this lab)
Value Function: Parameters for the value function estimation (you should not change these for this lab)
Entropy Bonus: Encourages exploration during training (you should not change these for this lab)
Command Sampling
Controls how velocity commands are generated during training:
Linear Velocity: Range for forward/backward and lateral movement
Angular Velocity: Range for turning commands
Zero Command Probability: Chance of receiving a zero-velocity command (you should not change these for this lab)
Stand Still Threshold: Velocity threshold below which commands are considered “standing still” (you should not change these for this lab)
Termination Conditions
Defines when an episode should end:
Body Height: Episode ends if body center goes below a certain height (you should not change these)
Body Angle: Episode ends if body angle exceeds a threshold (you should not change these)
Early Termination: Allows episodes to end before reaching maximum length (you should not change these)
Domain Randomization
Parameters that add variability to the simulation to improve robustness:
Perturbations: Random kicks, angular velocity noise, and gravity variations
Motor Properties: Random variations in position control gains
Starting Position: Random initial positions for training (you should not change these)
Latency: Simulated delays in action execution and IMU readings (you should not change these)
Body Properties: Random variations in mass, inertia, and center of mass
Friction: Random variations in ground friction
Heightfields and Obstacles
Environment features to test Pupper’s capabilities:
Heightfield Types: Random terrain or steps
Heightfield Parameters: Grid size, radius, and elevation
Obstacles: Number, position, and dimensions of obstacles
Understanding and tuning these parameters is key to training an effective walking policy. We will start with the basic velocity tracking reward and gradually add other terms to improve Pupper’s walking behavior.
DELIVERABLE: Before actually training a policy, what do you think will be the most important rewards to tune when training Pupper to walk forwards? What about making Pupper walk stably? Could these two factors have a combined effect and interfere? Write a few sentences in your lab document.
In addition, take a look at the implementation of the reward function in lines 488 to 490. Explain the implementation here in words and how the rewards dict that you edited above transfers to the actual reward.
Step 3. Velocity tracking
Let’s implement a naive reward function for Pupper velocity tracking
In the Reward Configuration section, change the
tracking_lin_velandtracking_ang_velvalues to some nonzero values to get Pupper to follow a velocity command. In practice, the linear velocity tracking coefficient should be around double the angular velocity trackingRun entire notebook, which loads in all the training and mjx configs, initializes Pupper in a flat environment, and trains Pupper to follow a desired velocity
Pupper should take around ~20 minutes to train.
DELIVERABLE: We use an exponential tracking function for Pupper to track a desired velocity. The plot below shows how the reward value depends on the x-axis velocity of the robot when the desired x-axis velocity is 1.0m/s.
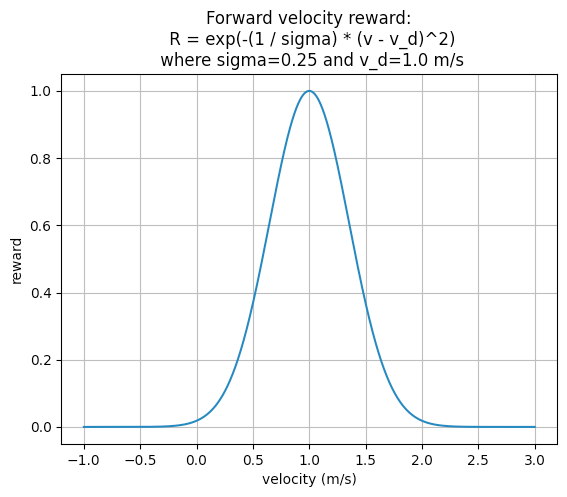
Exponential Tracking Function for Velocity
Since Pupper needs to maximize this function, should the reward coefficient be positive or negative, according to Nathan’s implementation? How else could you implement a velocity tracking function? Write it down in math.
DELIVERABLE: Visualize Pupper’s progress during training. How does Pupper look in the first 20 million env steps? How does it look after 200 million env steps?
You can access training videos in the training progress folder as shown below:
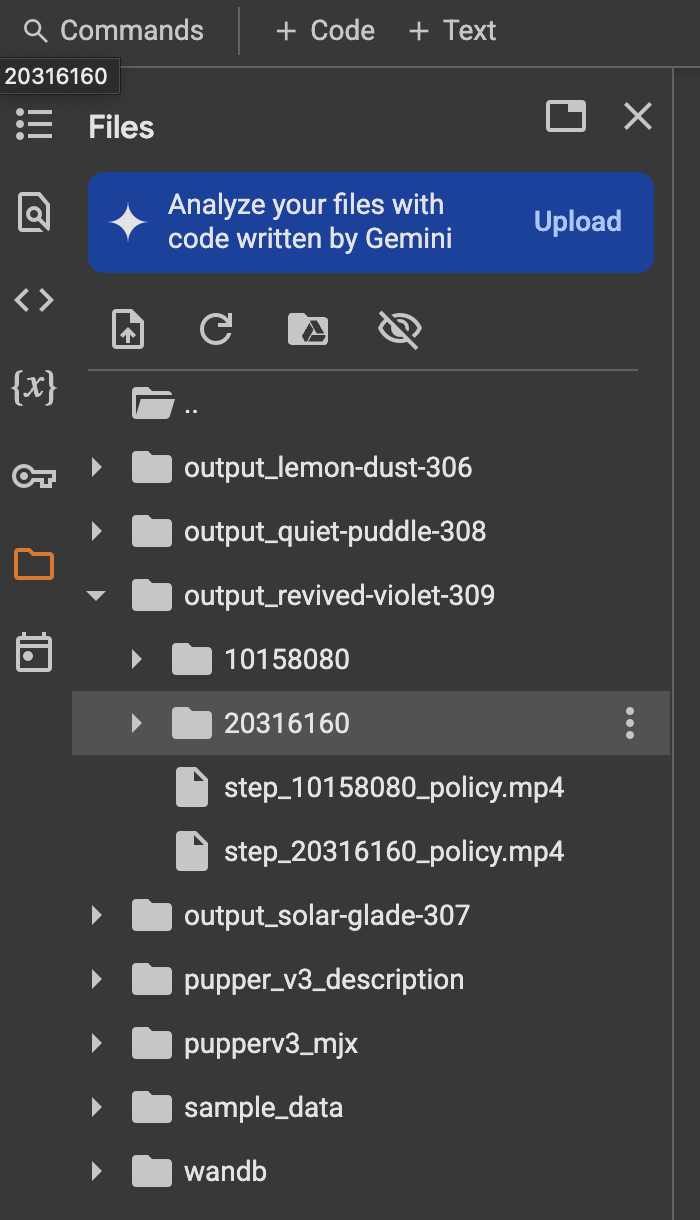
Training videos are saved in the training_progress folder.
Screen recording of walking in simulation. In the video, you can see Pupper learning to bend low, stand up, and walk in different directions - forward, backward, left, right, and turning both clockwise and counter-clockwise.

Earlier in training, Pupper will move seemingly randomly
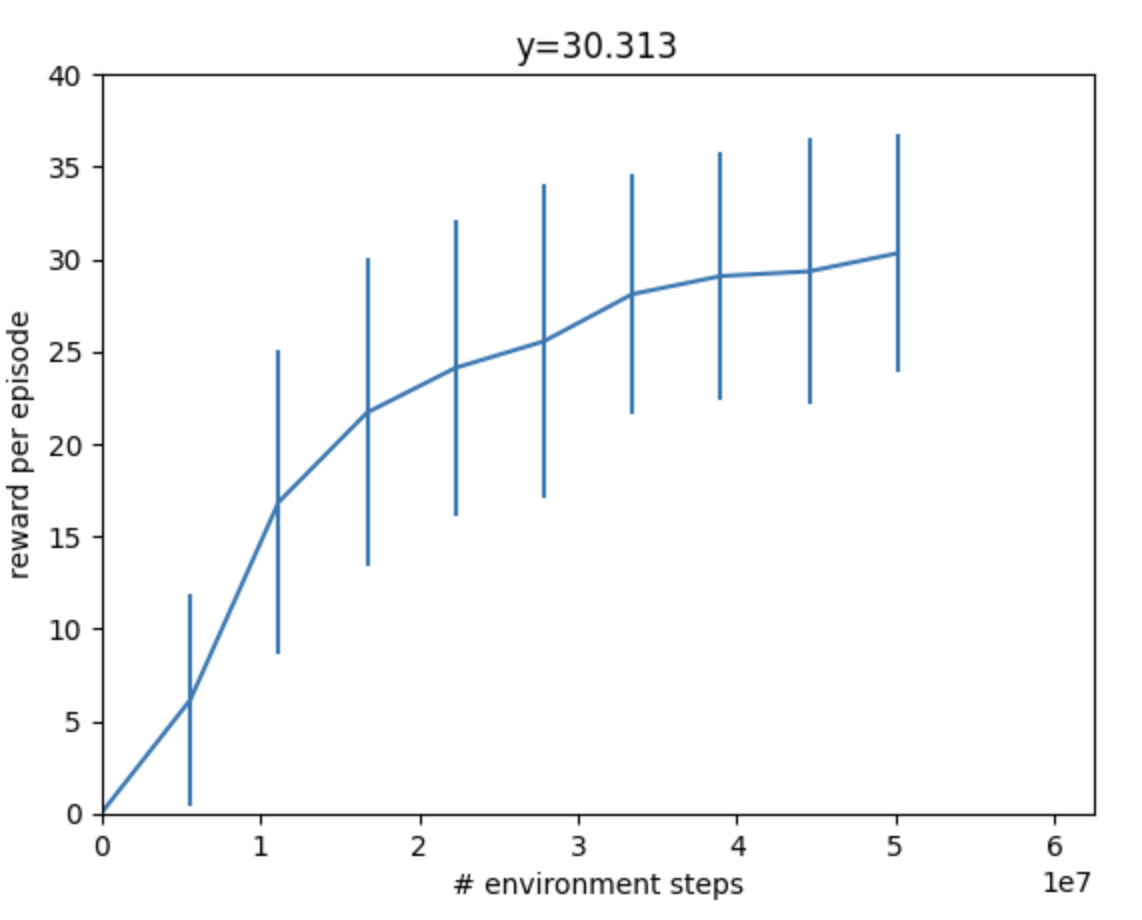
During training, your reward should be going up steadily and eventually plateau
As you may be able to tell, just because Pupper has velocity tracking reward doesn’t mean it will perfectly follow the desired speed. To learn natural gaits, auxiliary rewards are needed. Next, you will implement a function to encourage Pupper to walk more efficiently.
Step 4. Effort Conservation
Edit the Reward Configuration section to tune a reward function that helps Pupper conserve effort.
When tuning the reward function, think about which reward coefficients should be nonzero to encourage Pupper conserve energy. Should the coefficients be positive or negative?
Rerun the entire notebook to initialize Pupper in a flat environment and train Pupper to walk forward more efficiently.
Pupper should take around ~20 minutes to train.
DELIVERABLE: What is your reward function (in math, don’t just take a screenshot from the notebook!)? Why did you choose this function? What existing reward terms could be used to make Pupper conserve energy, and what are their potential pros and cons? Are there any rewards that could be used that are not listed?
DELIVERABLE: Qualitatively, how does this Pupper policy compare to the previous one?
DELIVERABLE: Record a video of Pupper walking in simulation.
Pupper should walk with much better stability and smoothness. However, it still shouldn’t have a super natural locomotion, and will likely not be robust to pushes or other changes in the environment. Next, you will implement several additional auxiliary rewards to help Pupper stay stable.
Step 5. Reward tuning
Now that you have a gist of how to tune the reward functions, it’s time to set you free! Tune the config to make Pupper smoothly follow velocities with a natural gait. Feel free to use any rewards you like (to reduce your search space, don’t try tuning other parameters yet!)
Increase the
training_config.ppo.num_timestepsto at least 300 million (in practice, Nathan used 1 billion timesteps to train a really good policy from scratch)Rerun the entire notebook, and train Pupper to walk in simulation
Depending on the number of timesteps, the training process should take around ~30 minutes to ~2 hours.
DELIVERABLE: What terms are included in your reward functions? What coefficients did you use? How did you come up with these terms and what was their desired effect? Do you think this policy will perform well on the physical robot?
DELIVERABLE: Visualize Pupper’s progress during training. How does Pupper look in the first 20 million env steps? How does it look after 200 million env steps?
DELIVERABLE: Record a video of Pupper walking in simulation.
You should aim to train a stable policy up to 0.75 m/s in simulation
DELIVERABLE: Record a video of Pupper standing still in simulation. To do this, you can set all commands to zero during visualization. Is Pupper able to stand still given zero commands?
Step 6. Deploy your walking policy
Deploy your policy to Pupper
After training your policy in Colab, you can deploy it directly to Pupper using the wandb integration. Make sure you have completed the neural controller setup from Step 1.
Connect your remote controller to Pupper
Navigate to the lab 5 directory and run the deployment script:
cd ~/lab_5_fall_2025
python3 deploy.py
The script will prompt you to enter the run number of the policy you want to deploy. You can find the run number in your wandb dashboard from your Colab training session (in the format of “random adjective-random noun-run number”). Enter the run number, or press Enter to keep the current policy.
The script will automatically download and deploy your trained policy from wandb.
Remember to press the square button on the remote controller to switch to your trained policy!
DELIVERABLE: In what ways is this policy different on the physical robot (compared to simulation)? We roboticists call this difference the “sim2real gap” (I think Jie invented this terminology for training robot dogs).
DELIVERABLE: Take a video of Pupper walking! Do you notice any differences when Pupper is walking on different surfaces?
DELIVERABLE: Inspect Pupper’s gait on each leg, and compare it to the triangle gait from the heuristics walking lab. Do Pupper’s legs move in a similar traingle motion in the gait you discovered? Write a few sentences about the similarities and differences you notice.

Deploy your policy on Pupper v3 (policy trained by Jaden)
Step 7. Domain randomization
Okay, so Pupper looks pretty good in sim, but the policy doesn’t look so great in the real world… (That was a comment from Jaden before the Pupper update. Now the sim2real transfer is much better, and you should have a decent policy even without domain randomization!)
To play with additional features in hopes of making the policy more robust, you will need to add randomization to the sim environment. Consider randomizing parameters such as Pupper mass, environment heightfields, or PID gains.
Edit the environment config to adequately represent all the situations Pupper might encounter in the real world
Try several magnitudes of the domain randomization terms to see what works
Iterate many times tuning the domain randomization and rewards for the best policy possible! An agile policy should be fast, efficient, stable, and robust to disturbances. Train the best policy you can!
Note
Feel free to reach out to the TAs if you have questions about modifying parameters in the notebook. Small changes can sometimes have unexpected effects on training behavior, and we’re happy to help you understand the impact of different parameters.
Your sim environment should expose Pupper to a variety of possible scenarios
DELIVERABLE: Comment on what might happen if you add too much domain randomization
DELIVERABLE: Record a video of Pupper walking in simulation, and another video of Pupper walking in the real world with this policy.
DELIVERABLE: Describe your approach to training an agile Pupper policy. What parameters were key? Did you use a heightfield? Why/why not?
DELIVERABLE: Report all the graphs you get from the notebook with the best policy. Do a thorough analysis of the graphs: How do the gaits look like for your policy? What are the outputs of the policy you just trained? How do you think it gets passed to Pupper?
Congratulations on completing Lab 5! This is a pretty hefty lab, and you’ve successfully trained Pupper to walk and gained valuable experience in tuning reward functions and domain randomization. These skills will be essential for the more advanced tasks in the upcoming optional lab!
Learning to Walk in Minutes Using Massively Parallel Deep Reinforcement Learning
Sim-to-Real: Learning Agile Locomotion For Quadruped Robots
Minimizing Energy Consumption Leads to the Emergence of Gaits in Legged Robots
Learning Agile Quadrupedal Locomotion Over Challenging Terrain